Importing Images: Difference between revisions
Jump to navigation
Jump to search
No edit summary |
(Added image and fixed spelling) |
||
| Line 1: | Line 1: | ||
The Pummel Party Mod Editor allows the import of custom files for your mod, custom image files can be used as textures for props and particle systems in your mod. See below table for supported formats. | The Pummel Party Mod Editor allows the import of custom files for your mod, custom image files can be used as textures for props and particle systems in your mod. See the below table for supported formats. | ||
== Supported File Formats == | == Supported File Formats == | ||
| Line 17: | Line 17: | ||
== Import Options == | == Import Options == | ||
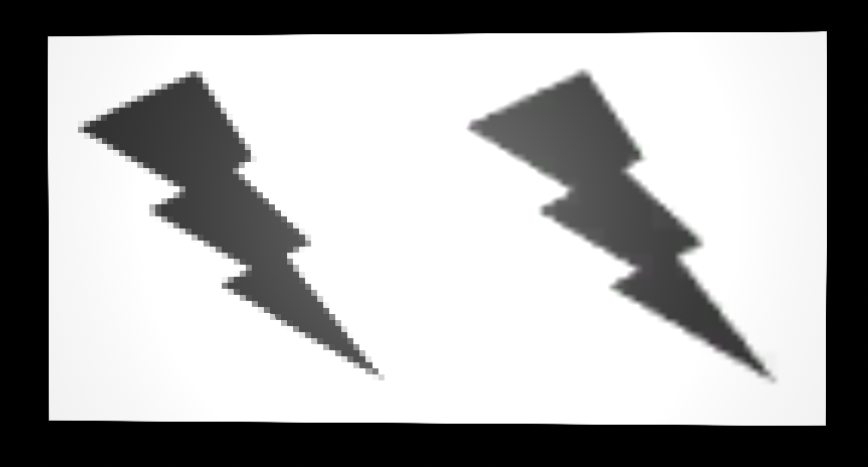
[[File:PointVsBilinear.png|thumb|600px|right|Point filtering (Left) vs Bilinear filtering (right). Point is suited to pixel art, while bilinear is suited to more detailed textures.]] | |||
{| class="wikitable" | {| class="wikitable" | ||
|- | |- | ||
! Property !! Description | ! Property !! Description | ||
|- | |- | ||
|'''Texture Compression''' || Determines what level of compression is applied to the texture at runtime. (does not | |'''Texture Compression''' || Determines what level of compression is applied to the texture at runtime. (does not affect disk size) | ||
|- | |- | ||
| style="padding-left: 2em;" | ''Normal'' || Normal compression is applied. | | style="padding-left: 2em;" | ''Normal'' || Normal compression is applied. | ||
| Line 31: | Line 32: | ||
| '''Filter Mode''' || Modifies the filter applied when sampling a texture. | | '''Filter Mode''' || Modifies the filter applied when sampling a texture. | ||
|- | |- | ||
| style="padding-left: 2em;" | ''Point'' || The textures | | style="padding-left: 2em;" | ''Point'' || The textures are not filtered and displayed as is (shows up pixelated similar to Minecraft textures) | ||
|- | |- | ||
| style="padding-left: 2em;" | ''Bilinear'' || Texture samples are averaged giving a smooth result. | | style="padding-left: 2em;" | ''Bilinear'' || Texture samples are averaged giving a smooth result. | ||
| Line 37: | Line 38: | ||
| style="padding-left: 2em;" | ''Trilinear'' || Texture samples are averaged and also blended with mipmaps. | | style="padding-left: 2em;" | ''Trilinear'' || Texture samples are averaged and also blended with mipmaps. | ||
|- | |- | ||
| '''Wrap Mode''' || | | '''Wrap Mode''' || Affects how the texture is displayed if UV coordinates are outside the range of 0 to 1. | ||
|- | |- | ||
| style="padding-left: 2em;" | ''Repeat'' || The texture is repeated in a tiling pattern. | | style="padding-left: 2em;" | ''Repeat'' || The texture is repeated in a tiling pattern. | ||
| Line 56: | Line 57: | ||
# You will have the option of what type of asset to import, select 'Texture'. | # You will have the option of what type of asset to import, select 'Texture'. | ||
# Using the windows file browser, navigate to the image file you want to import. | # Using the windows file browser, navigate to the image file you want to import. | ||
# Your image should now show up as a | # Your image should now show up as a usable texture asset in the 'Asset Browser' window under the 'Custom/Textures' folder. | ||
Latest revision as of 23:08, 15 December 2022
The Pummel Party Mod Editor allows the import of custom files for your mod, custom image files can be used as textures for props and particle systems in your mod. See the below table for supported formats.
Supported File Formats
| Format | Extension | Description | Usage |
|---|---|---|---|
| PNG | .png | PNG format uses lossless compression and allows for transparency. | Use for small textures where quality matters. |
| JPEG | .jpeg, .jpg | JPEG format uses lossy compression but does not allow for transparency. | Use for large textures where quality does not matter. |
| BMP | .bmp | BMP format Bitmap Image File. | Avoid using |
Import Options
| Property | Description |
|---|---|
| Texture Compression | Determines what level of compression is applied to the texture at runtime. (does not affect disk size) |
| Normal | Normal compression is applied. |
| High Quality | High Quality compression reduces compression artefacts but takes longer to compress. |
| None | No compression is applied to the texture. |
| Filter Mode | Modifies the filter applied when sampling a texture. |
| Point | The textures are not filtered and displayed as is (shows up pixelated similar to Minecraft textures) |
| Bilinear | Texture samples are averaged giving a smooth result. |
| Trilinear | Texture samples are averaged and also blended with mipmaps. |
| Wrap Mode | Affects how the texture is displayed if UV coordinates are outside the range of 0 to 1. |
| Repeat | The texture is repeated in a tiling pattern. |
| Clamp | The texture repeats the last pixel at each edge. |
| Mirror | Similar to 'Repeat' but mirrors the texture at each boundary. |
| Mirror once | Mirrors the texture once then clamps at each edge. |
How To Import Custom Images
- Open the Mod Editor.
- Load a mod project from the file menu or create a new mod.
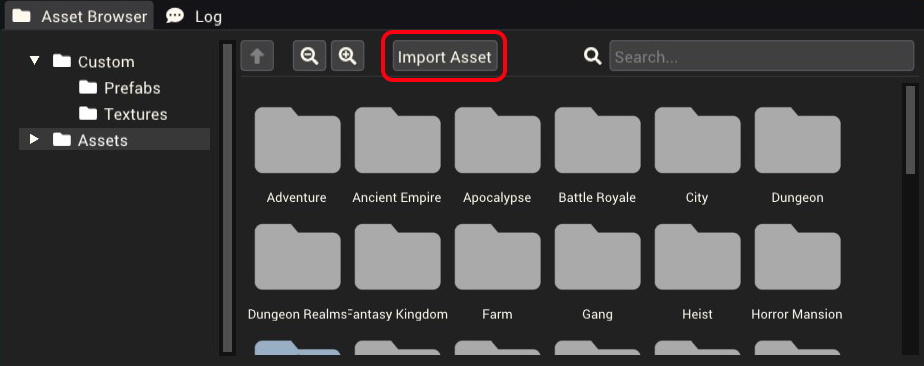
- At the bottom of the screen find the 'Asset Browser' window.
- In the file browser window you will see the 'Import Asset' button, click this.
- You will have the option of what type of asset to import, select 'Texture'.
- Using the windows file browser, navigate to the image file you want to import.
- Your image should now show up as a usable texture asset in the 'Asset Browser' window under the 'Custom/Textures' folder.

