Tutorials/Building A Minigame Mod: Difference between revisions
(Added some images) |
(Added more content and images) |
||
| Line 27: | Line 27: | ||
Make sure all spawn points are above solid ground. It's not very fun for the player who spawns beneath the ground and falls through the level. | Make sure all spawn points are above solid ground. It's not very fun for the player who spawns beneath the ground and falls through the level. | ||
=== Adding a goal or objective === | |||
When making a minigame you should decide on what the objective is. For this tutorial the minigame will give players a point whenever they collect an item. We'll start by creating the item. Right click the Hierarchy window and choose ''Minigame Object > Item'' This will create a new gameobject that contains an item component. The Item component has many settings and is very versatile. See the [[Item Component]] page for an explanation of all of the settings. We just want an item that rewards the player with a point for collecting it. We don't want the player to hold the item so it should be dropped straight away. It should also be destroyed when dropped to make it seem like the player collected it. | |||
* Under General Settings, set the ''Item Type'' to ''Worn''. This is the simplest item type that offers the least functionality. It is all we need. | |||
* Under Drop Settings, Enable ''Auto Drop After Time'' and set it to 0. This will make the item drop instantly on pickup. | |||
* Under Drop Settings, Enable ''Disappear when Dropped''. This will destroy the item so it can't be picked up again. | |||
* Under Pickup Settings, edit the '''On Pickup' Actions''. | |||
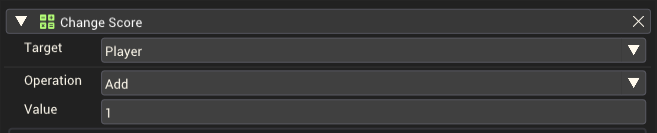
** In the action editor, add a [[Change Score Action]]. Give it the following settings. [[File:AddScoreAction.png]] | |||
Here is what your item should look like in the inspector at this stage. | |||
[[File:ItemSettingsModTutorial.png]] | |||
The last thing this item needs is a prefab containing its visuals. Visuals here just means some objects that can be seen by the players. The item currently has nothing assigned to the ''Item Prefab'' field, so it will use the default visual of a carrot. We should provide our own prefab for the item's appearance. | |||
You can create a new prefab in one of a few ways | |||
1. From the toolbar using ''Assets > Create > Prefab'' | |||
2. From the asset browser by right clicking and choosing ''Create > Prefab'' | |||
3. By dragging a gameobject that you'd like to turn into a prefab, from the Hierarchy Window to the Asset Browser. | |||
I'll use the first option. This creates a new prefab. You can select it and use F2 or ''Right click > Rename'' to rename it. I've named the prefab "KeyItemVisuals" because I'm going to make the item look like a key. Double click on the prefab in the Asset Browser to edit it. Add a new gameobject with a prop component to the prefab as a child. You could also add a prop component directly to the root gameobject. Here's how it looks. [[File:KeyPrefab.png]] | |||
With the prefab created, return to the main scene view by clicking "← Return to Hierarchy" at the top of the hierarchy window. Now select the item and add the prefab you just created to the ''Item Prefab'' field. Now in the Scene View the item should appear with the shape of the prefab visuals. | |||
=== Spawning multiple items === | |||
One item is good, but we want players to be collecting many items. We could just duplicate this item and place them around the scene, but what if we want to change the settings on the item? We'd have to go and edit every single item duplicate we made. A better way is to create a prefab containing this item, and make many prefab instances. Then if we want to update something about the item, we can do it in the prefab and all prefab instances in the scene will update. | |||
To create a prefab of the item, we'll use the third method mentioned earlier. Drag the item gameobject into the Asset Browser. This Creates the new prefab, remember to rename it if you'd like. I'll call it "KeyItem". Now you can drag the prefab you just made into the Scene View to add a Prefab Instance to the scene. These appear in blue in the Hierarchy Window. You can also delete the original item gameobject from the scene since it's now stored in the new prefab. | |||
Here I've created eight prefab instances of the KeyItem and am testing the mod in playmode. | |||
[[File:KeyItemInPlayMode.png]] | |||
The keys are a bit small, we can make them larger by editing the prefab they're using for their visuals. Double click on the first prefab we made, "KeyItemVisuals", in the Asset Browser. Scale up the prop. I changed the scale to be 3 on all axis. [[File:ScaleToThreeTimesSize.png]] | |||
Now returning to the hierarchy and entering play mode, the keys look like this. [[File:LargerKeys.png]] Much better! Walking into them also collects them and gives a point to the player, so they're working as expected. | |||
== Adjusting the Mod Settings == | == Adjusting the Mod Settings == | ||
Revision as of 01:09, 16 November 2022
This tutorial will take you through the steps of building a working minigame mode. It will start from a completely empty minigame mod and build up to a working minigame. This tutorial assumes basic understanding of the mod editor, including how to access and create a new mod.
Creating the mod
The mod template being used for this tutorial is the "Empty" minigame mod template. This template has default values for all mod settings and has no gameobjects in the scene. The minigame created is not immediately playable as it lacks spawnpoints and solid ground.
Adding solid ground
Players will need some kind of solid terrain or objects to stand on when they spawn. Their are many props suitable for this. Add a new prop from the hierarchy window by right clicking and choosing 3D Object > Prop. The object you created will be invisible in the scene view as it hasn't got a visible prob assigned to it. With the gameobject selected in the hierarchy, look to the inspector to see the Prop Component attached to the gameobject. Click on the Prop field button in the inspector to assign a new prop. Some good search terms for large terrain-like props are "Ground", "Floor", "Grass", "Terrain" or "Flat". Here I'll choose GroundMounds 05.

To make sure players can stand on this prop, check that the Collision Type isn't set to None. It defaults to Mesh, which makes the prop solid in a way that you'd expect, where the collider exactly matches the shape of the visible mesh. For simple props you can use simpler collision shapes, such as the Box or Sphere options.
To quickly build a level for players, duplicate the prop using Ctrl+D and move the copy somewhere else. You can scale, rotate or change the prop each time to add variety to the scene.

Adding spawn points


Now that players have some solid ground to stand on, we need to add spawnpoints to define where they should spawn at the start of the minigame. Add a spawnpoint by right clicking the hierarchy and choosing Minigame Object > Player Spawn. You will see a white pummel party player appear. This indicates a player spawn point.
With just this single spawn point, all 8 players will spawn in the same place. Changing the Spawn Shape to "Line" is better as it will space each player out along a line. You can set the length of this line to space players out further. Alternately, you can use a Spawn Shape of "Circle" to place players in a ring.
If you want finer control over the spawn points of players, the advanced option "Allowed Players" can be used to specify exactly which players are allows to spawn at a specific spawn point. by creating eight spawn points, each only allowing a single player, you can define the exact spawn point for a single player anywhere in the scene.
File:EightUniqueSpawnPoints
Make sure all spawn points are above solid ground. It's not very fun for the player who spawns beneath the ground and falls through the level.
Adding a goal or objective
When making a minigame you should decide on what the objective is. For this tutorial the minigame will give players a point whenever they collect an item. We'll start by creating the item. Right click the Hierarchy window and choose Minigame Object > Item This will create a new gameobject that contains an item component. The Item component has many settings and is very versatile. See the Item Component page for an explanation of all of the settings. We just want an item that rewards the player with a point for collecting it. We don't want the player to hold the item so it should be dropped straight away. It should also be destroyed when dropped to make it seem like the player collected it.
- Under General Settings, set the Item Type to Worn. This is the simplest item type that offers the least functionality. It is all we need.
- Under Drop Settings, Enable Auto Drop After Time and set it to 0. This will make the item drop instantly on pickup.
- Under Drop Settings, Enable Disappear when Dropped. This will destroy the item so it can't be picked up again.
- Under Pickup Settings, edit the 'On Pickup' Actions.
- In the action editor, add a Change Score Action. Give it the following settings.
- In the action editor, add a Change Score Action. Give it the following settings.

Here is what your item should look like in the inspector at this stage.

The last thing this item needs is a prefab containing its visuals. Visuals here just means some objects that can be seen by the players. The item currently has nothing assigned to the Item Prefab field, so it will use the default visual of a carrot. We should provide our own prefab for the item's appearance.
You can create a new prefab in one of a few ways 1. From the toolbar using Assets > Create > Prefab 2. From the asset browser by right clicking and choosing Create > Prefab 3. By dragging a gameobject that you'd like to turn into a prefab, from the Hierarchy Window to the Asset Browser.
I'll use the first option. This creates a new prefab. You can select it and use F2 or Right click > Rename to rename it. I've named the prefab "KeyItemVisuals" because I'm going to make the item look like a key. Double click on the prefab in the Asset Browser to edit it. Add a new gameobject with a prop component to the prefab as a child. You could also add a prop component directly to the root gameobject. Here's how it looks. 
With the prefab created, return to the main scene view by clicking "← Return to Hierarchy" at the top of the hierarchy window. Now select the item and add the prefab you just created to the Item Prefab field. Now in the Scene View the item should appear with the shape of the prefab visuals.
Spawning multiple items
One item is good, but we want players to be collecting many items. We could just duplicate this item and place them around the scene, but what if we want to change the settings on the item? We'd have to go and edit every single item duplicate we made. A better way is to create a prefab containing this item, and make many prefab instances. Then if we want to update something about the item, we can do it in the prefab and all prefab instances in the scene will update.
To create a prefab of the item, we'll use the third method mentioned earlier. Drag the item gameobject into the Asset Browser. This Creates the new prefab, remember to rename it if you'd like. I'll call it "KeyItem". Now you can drag the prefab you just made into the Scene View to add a Prefab Instance to the scene. These appear in blue in the Hierarchy Window. You can also delete the original item gameobject from the scene since it's now stored in the new prefab.
Here I've created eight prefab instances of the KeyItem and am testing the mod in playmode.

The keys are a bit small, we can make them larger by editing the prefab they're using for their visuals. Double click on the first prefab we made, "KeyItemVisuals", in the Asset Browser. Scale up the prop. I changed the scale to be 3 on all axis.  Now returning to the hierarchy and entering play mode, the keys look like this.
  Much better! Walking into them also collects them and gives a point to the player, so they're working as expected.
Adjusting the Mod Settings
If you have an idea of what the goal of the minigame is, the mod settings can be used to enforce that. See Mod Settings for a detailed explanation of all available settings.
Minigame Details
Here you can set the mod's name as it appears ingame, along with the description and preview shown on the loading screen and in other menus such as the ruleset menu.
To capture a preview image, you can use the screenshot button in the toolbar, or press F10. This will save a screenshot to the mod's Custom assets that will then appear when trying to set a new preview image. You can also import a custom image as an asset through the "Import Asset" button in the Asset Browser Window.
Minigame Controller Settings
Here you can set the win condition and placement rules.
For this tutorial, we'll make the minigame end when someone reaches 10 points. Set the End condition to "Obtain Points" and set the Points to Win to 10.

Minigame Player Settings
Here you can set player settings. This includes whether the player is controlled using a third person or top down camera, how fast they move and how high they can jump, if they can punch, if they should use health, and more.