Introduction to the Mod Editor
Overview
So you want to make workshop mods for Pummel Party? Great! The mod editor will be your tool to do so.
The mod editor UI and functionality are based on the Unity Editor, so if you’re familiar with game development using that platform, you’ll have no problem understanding the mod editor. If you don’t have Unity experience, read on to learn about the basics of creating a mod and what the various windows in the editor are for. There are several differences between the Pummel Party Mod Editor and the Unity Editor, so it is still recommended to read on even if you have previous Unity experience.
All objects within a mod that have a position in space are called Gameobjects. These gameobjects can be structured into a hierarchy within the mod. Gameobjects can have Components attached to them. Components provide the gameobject with some kind of logic or functionality. Creating a mod involves placing gameobjects with certain components to build a level. There are several Mod Settings that can be adjusted to change the mod's description and preview image, rules, player physics, lighting and more. Once a scene is built and settings are adjusted, the mod can be published to the Steam Workshop for others to download and play.
Accessing the Mod Editor
The Pummel party Mod Editor is packaged into the Pummel Party executable; it is not a separate program. Open the game and from the main menu, click the "Workshop" button. From here select the "Mod Editor" button. This will open the mod editor and display the mod editor welcome screen.
To start creating a mod, select "New Mod" from this screen and choose a template to create your mod. Take note of the template's mod type; it will be either a Minigame Mod or a Board Mod. The type of mod cannot be changed later so be sure to select the correct mod type!
Basic workflow
- Create gameobjects in the hierarchy
- Position and preview gameobjects in the scene view
- Add and configure components to gameobjects via the inspector
- Edit the Mod Settings as required
- Playtest the mod in the mod editor
- Publish the mod to the Steam Workshop
If you need custom assets to use with a component, you can add them from the Asset Browser
Windows
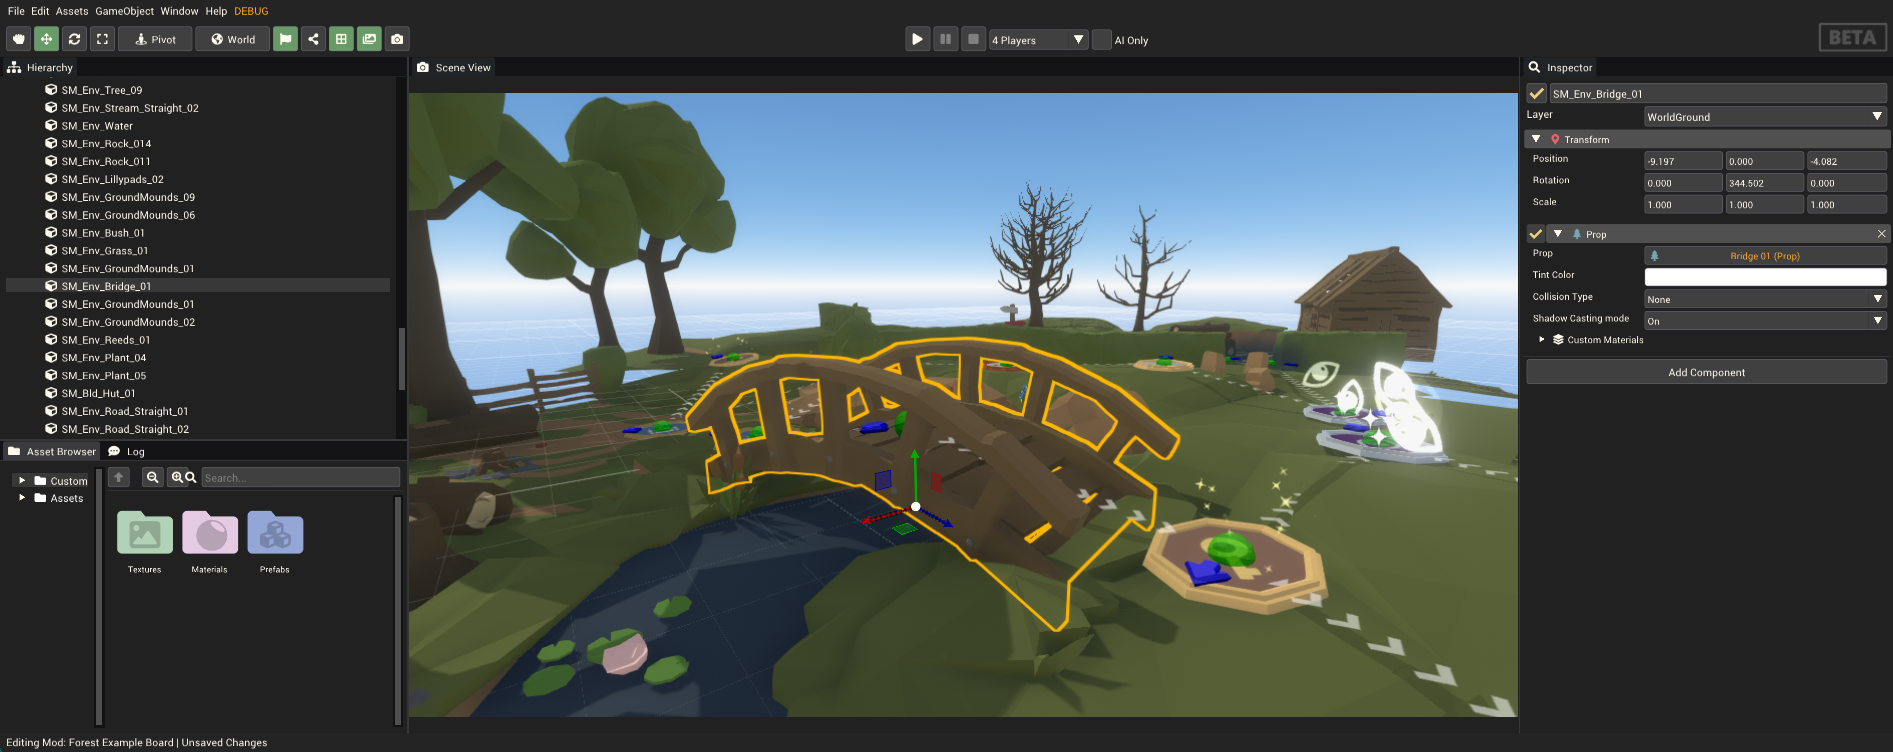
Hierarchy
The Hierarchy Window contains the list and structure of all gameobjects in the mod. It also contains a special object at the top of the hierarchy that contains the settings specific to the current mod. Clicking on any object in the hierarchy will select it in the hierarchy, the scene view and the inspector windows.
Inspector
The Inspector Window is where you can add and configure components attached to gameobjects.
Scene View
The Scene View shows a 3D view of the mod.
Asset Browser
The Asset Browser lets you view and select any built-in or custom mod assets.
Logs
The Log Window lets you see any errors from the game.
Other Windows
These windows exist as popups and can be opened from the File menu in the toolbar.
